Summer Breeze -the 1/4 sized model. (Full size boat here)
 (Click on any picture to view it larger)
This is actually a quarter sized model made from two sheets of 24"x48"
1/8" ply. She is 70" long and 25" wide. Here are some of the building steps.

The sides are cut from one ply sheet like this. Butt blocks are cut from each of the ends. (I used a utility knife for cutting the 1/8" ply, which made model making a breeze.) Here's a drawing that might be clearer.
 You notice the cuts are all straight except the rounding of rise to the transom.
The sides are stacked and turn of the bottom is softened with a plane or belt
sander.
You notice the cuts are all straight except the rounding of rise to the transom.
The sides are stacked and turn of the bottom is softened with a plane or belt
sander.

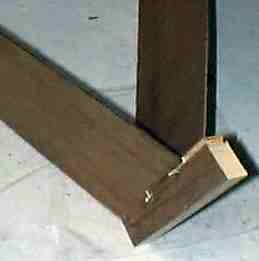
The stem or cutwater is made from 2x4 stock (on full sized boat) with slots (at 27 degree angle) to accept the sides. This approach is a variation on a method I once used to make musical instrument cases years ago. It works even better on boat stems. Mike Goodwin uses this technique on his Two Sheet skiff. Check it out.
 The sides are just glued
into the slots... simple.
The sides are just glued
into the slots... simple.
This kind of stem or cutwater gives plenty of wood to curve or carve as you wish.
Sides bent around spreader sticks cut to length from frame dimensions, attached to the transom. The transom in the full sized boat is made form 2x12 pine. (the model uses 1x6) The spreader sticks seemed like a great idea, but as uniform as ply is it tends to bend rather non uniformly. Next time I'll connect the spreaders to each other and triangulate them into a frame. Keeping the boat symmetrical will then be much easier.

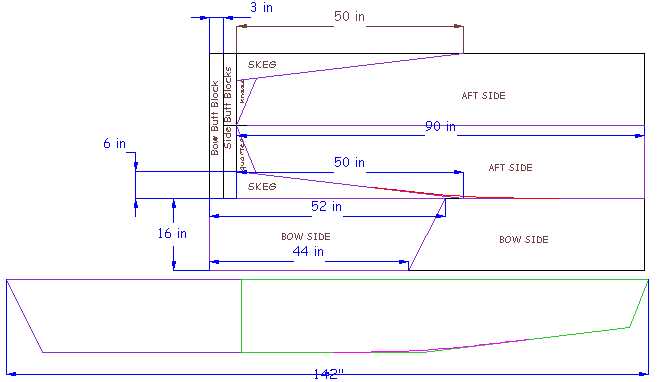
How do you make a bottom for an almost 12 foot boat from an 8 foot piece of
plywood?
By realizing that butt blocks are our friends!
This isn't a very good photo, but I've tried to make it clearer with some lines. The bottom is made from one sheet by cutting off two triangles then swinging them around and gluing them with butt blocks. The dotted lines show where the wood joins under the butt blocks. My approach to butt blocks is as easy as it gets. I tape some plastic wrap to a sheet of OSB. set down the pieces as I want them to be glued. I trial fit the butt blocks and mark with their locations. I then butter them up with glue (in this case Titebond 2, PL Premium on the full sized boat) then staple through them and into the OSB. Later the staple are pulled and the holes filled before sanding and painting. Also, the edges of the blocks are feathered (tapered at shallow angle) and sanded before painting. Here's a drawing that might make it a little clearer. The short leg is 12" and the long one is 28".

Now for the keel and skeg.
Slotting the keel for the skeg I borrowed from the Bevin's Skiff. It avoids having to shape the bottom of the skeg to the curve of the hull. Works great.

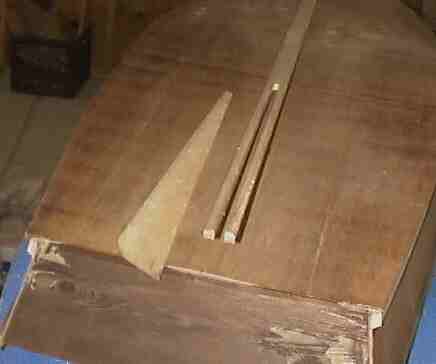
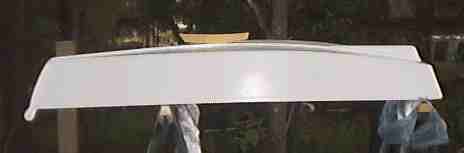
Here's a side view in the wood. You can see where the sides join (butt blocks) and how they taper to the transom. There is no lofting per se. A straight cut is made through the stacked sides to the transom, then smoothed into a curve with a saw or sander. (You can also lay out the curve with a batten and cut it with a saw.)
Side view after primer coat with the paper model sitting on top.

Here's a 3/4 view. A little trim paint goes a long way. This is applied with a small roller, no masking.

The big hunk of stem wood allows for a bit of embellishment if you choose. I did a rather quick and dirty reverse curve with a bow eye hole. A little chunky here on the model, but hopefully it will be more subtle on the "real thing."
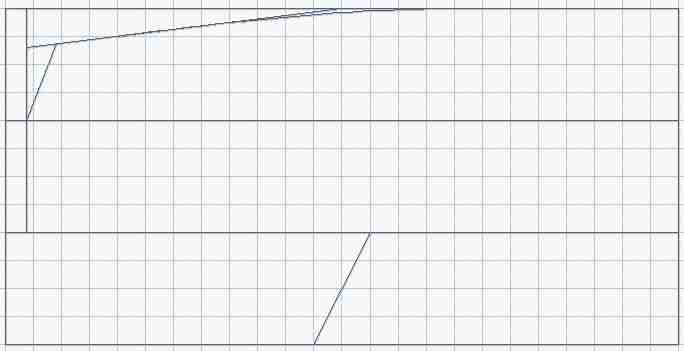
As I built this model I realized it could be a coffee table or shelf after I learned my lessons from it. As it evolved I realized it was perhaps a good size for a kid. I went back to Gregg Carlson's Hulls program and found she would trim nicely with 80 to 100 pounds in her. And quite possible hold me (170 lbs) with about 2 inches of freeboard. Lets go find out! Here's a look at a screen calc.
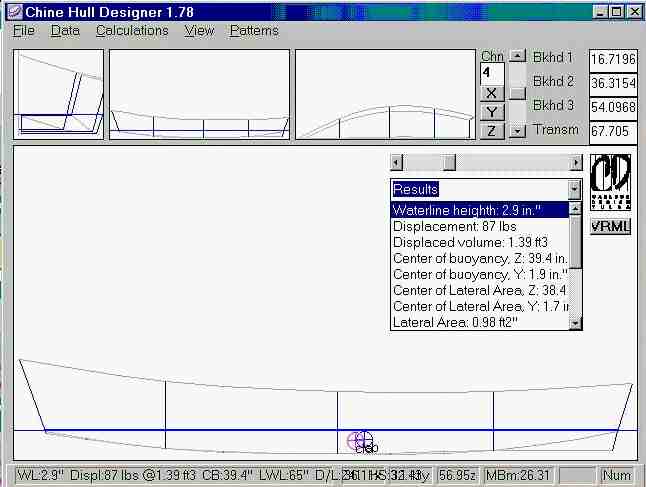
In computer land, the water kisses the stem and transom at 87 lbs. Let's compare this to the "real" world.
SEA TRIALS!
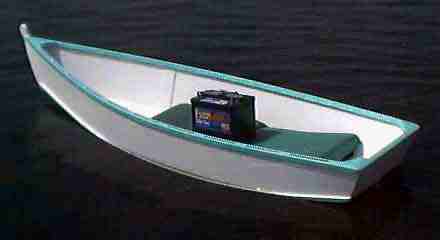
Here she is on her first voyage, empty except for a couple of seat cushions. The hull weighs 10 pounds.
![]()
Her chine log is barely covered.
This is with a 20lb battery for crew... transom and stem still high and dry.

This battery weights 56lbs and her transom and stem still clear the water. (Think I can get any product placement revenue from this? )
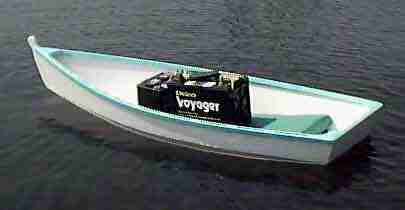
This is with 76 lb of batteries and the cushions plus the 10 lb hull, transom and stem are about an inch below the surface. Pretty close to the computer prediction!
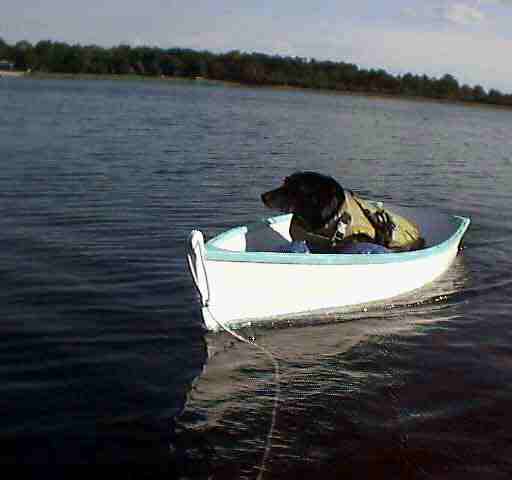
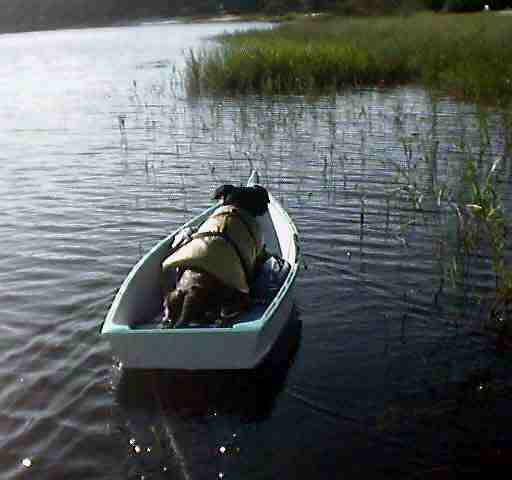
Kayla the wonder dog volunteers to test pilot. It trims so nicely she decides to take it fishing!
There was no small person test pilot handy, so I decided to test Gregg's program and see if she would hold me. Wouldn't you know after all these nice smooth water tests the jet skis arrived and altered conditions significantly. I was able to just barely kneel on the cushions with about an inch of freeboard. It was a balancing act that ended rather damply. (There also was no one around to work the camera, so you'll have to take my word on this one.) Though the program predicted better, I have to keep in mind what is lost to chine logs. A stitch and glue (or inner chine logs) would have slightly more capacity.
Here she is compared to Cygnet, my Herb Mcleod designed One Sheet Skiff.
And I thought Cygnet was a little boat!
Full sized building notes here.